This is a read-only mirror of pymolwiki.org
Difference between revisions of "Rotkit"
m (43 revisions) |
|||
| (23 intermediate revisions by one other user not shown) | |||
| Line 1: | Line 1: | ||
| − | == | + | {{Infobox script-repo |
| − | + | |type = script | |
| + | |filename = rotkit.py | ||
| + | |author = [[User:Tlinnet|Troels E. Linnet]] | ||
| + | |license = BSD | ||
| + | }} | ||
== Introduction == | == Introduction == | ||
This script-kit is a collection of small script to be able to precisely to put a molecule (like a dye) where you want in relation to a protein. | This script-kit is a collection of small script to be able to precisely to put a molecule (like a dye) where you want in relation to a protein. | ||
| + | |||
| + | You can also create rotational states of a domain or simulate a dye freedom. | ||
| + | |||
It simply makes the [[Object_Matrix | PyMOL TTT matrixes]], in a easy and user friendly way. The calls to the functions available in PyMOL, takes care of all the | It simply makes the [[Object_Matrix | PyMOL TTT matrixes]], in a easy and user friendly way. The calls to the functions available in PyMOL, takes care of all the | ||
conversion of input and such. | conversion of input and such. | ||
| Line 9: | Line 16: | ||
If you are interested in this, you might also want to check out the PyMOL [[Chempy]] module that is included in PyMOL. It provides handy vector and matrix functions. | If you are interested in this, you might also want to check out the PyMOL [[Chempy]] module that is included in PyMOL. It provides handy vector and matrix functions. | ||
| − | + | === Functions available in PyMOL === | |
* rotateline(Pos1,Pos2,degangle,molecule): | * rotateline(Pos1,Pos2,degangle,molecule): | ||
*: "Pos1->Pos2" define a line whereabout "molecule" will be rotated "degangle" degrees | *: "Pos1->Pos2" define a line whereabout "molecule" will be rotated "degangle" degrees | ||
| Line 49: | Line 56: | ||
== Example of use == | == Example of use == | ||
| − | === Make a rotation of domain === | + | === Example 1 - Make a rotation of domain === |
| − | + | {{Template:PymolScriptRepoDownload|examples/rotkit_1.pml}} | |
| − | + | <include src="https://raw.github.com/Pymol-Scripts/Pymol-script-repo/master/examples/rotkit_1.pml" highlight="python" /> | |
| − | |||
| − | |||
| − | |||
| − | |||
| − | |||
| − | |||
| − | |||
| − | |||
| − | |||
| − | |||
| − | |||
| − | |||
| − | |||
| − | |||
| − | |||
| − | |||
| − | |||
| − | |||
| − | |||
| − | |||
| − | |||
| − | |||
| − | |||
| − | |||
| − | |||
| − | |||
| − | |||
| − | |||
| − | |||
| − | |||
| − | |||
| − | |||
| − | |||
| − | |||
| − | |||
| − | |||
| − | |||
| − | |||
| − | < | ||
| − | |||
| − | = | ||
| − | |||
| − | |||
| − | |||
| − | |||
| − | |||
| − | |||
| − | |||
| − | |||
| − | |||
| − | |||
| − | |||
| − | |||
| − | |||
| − | |||
| − | |||
| − | |||
| − | |||
| − | |||
| − | |||
| − | |||
| − | |||
| − | |||
| − | |||
| − | |||
| − | |||
| − | |||
| − | |||
| − | |||
| − | |||
| − | |||
| − | |||
| − | |||
| − | |||
| − | |||
| − | |||
| − | |||
| − | |||
| − | |||
| − | |||
| − | |||
| − | |||
| − | |||
| − | |||
| − | |||
| − | |||
| − | |||
| − | |||
| − | |||
| − | |||
| − | |||
| − | |||
| − | |||
| − | |||
| − | |||
| − | |||
| − | |||
| − | |||
| − | |||
| − | |||
| − | |||
| − | |||
| − | |||
| − | |||
| − | |||
| − | |||
| − | |||
| − | |||
| − | |||
| − | |||
| − | |||
| − | |||
| − | |||
| − | |||
| − | |||
| − | |||
| − | |||
| − | |||
| − | |||
| − | |||
| − | |||
| − | |||
| − | |||
| − | |||
| − | |||
| − | |||
| − | |||
| − | |||
| − | |||
| − | |||
| − | |||
| − | |||
| − | |||
| − | |||
| − | |||
| − | |||
| − | |||
| − | |||
| − | |||
| − | |||
| − | |||
| − | |||
| − | |||
| − | |||
| − | |||
| − | |||
| − | |||
| − | |||
| − | |||
| − | |||
| − | |||
| − | |||
| − | |||
| − | |||
| − | |||
| − | |||
| − | |||
| − | |||
| − | |||
| − | |||
| − | |||
| − | |||
| − | |||
| − | |||
| − | |||
| − | |||
| − | |||
| − | |||
| − | |||
| − | |||
| − | |||
| − | |||
| − | |||
| − | |||
| − | |||
| − | |||
| − | |||
| − | |||
| − | |||
| − | |||
| − | |||
| − | |||
| − | |||
| − | |||
| − | |||
| − | |||
| − | |||
| − | |||
| − | |||
| − | |||
| − | |||
| − | |||
| − | |||
| − | |||
| − | |||
| − | |||
| − | + | === Example 2 - Simulate dye freedom === | |
| − | + | {{Template:PymolScriptRepoDownload|examples/rotkit_2.pml}} | |
| − | + | <include src="https://raw.github.com/Pymol-Scripts/Pymol-script-repo/master/examples/rotkit_2.pml" highlight="python" /> | |
| − | |||
| − | |||
| − | + | === Example 3 - Create distance distribution histogram === | |
| − | + | {{Template:PymolScriptRepoDownload|examples/rotkit_3.pml}} | |
| − | + | <include src="https://raw.github.com/Pymol-Scripts/Pymol-script-repo/master/examples/rotkit_3.pml" highlight="python" /> | |
| − | |||
| − | |||
| − | |||
| − | == | + | === Example 4 - A tutorial file === |
| − | + | To understand how the functions works, read through the tutorial. Hash/Unhash "##" each step at the time to see the effect. | |
| + | To be able to follow the tutorial, you need the dye molecule, which is loaded from the Pymol-script-repository. | ||
| − | + | {{Template:PymolScriptRepoDownload|examples/rotkit_4.pml}} | |
| − | + | <include src="https://raw.github.com/Pymol-Scripts/Pymol-script-repo/master/examples/rotkit_4.pml" highlight="python" /> | |
| − | |||
| − | |||
[[Category:Script_Library]] | [[Category:Script_Library]] | ||
[[Category:ObjSel_Scripts]] | [[Category:ObjSel_Scripts]] | ||
| + | [[Category:Pymol-script-repo]] | ||
Latest revision as of 03:09, 28 March 2014
| Type | Python Script |
|---|---|
| Download | rotkit.py |
| Author(s) | Troels E. Linnet |
| License | BSD |
| This code has been put under version control in the project Pymol-script-repo | |
Introduction
This script-kit is a collection of small script to be able to precisely to put a molecule (like a dye) where you want in relation to a protein.
You can also create rotational states of a domain or simulate a dye freedom.
It simply makes the PyMOL TTT matrixes, in a easy and user friendly way. The calls to the functions available in PyMOL, takes care of all the conversion of input and such.
If you are interested in this, you might also want to check out the PyMOL Chempy module that is included in PyMOL. It provides handy vector and matrix functions.
Functions available in PyMOL
- rotateline(Pos1,Pos2,degangle,molecule):
- "Pos1->Pos2" define a line whereabout "molecule" will be rotated "degangle" degrees
- rotateline Pos1=P513C_CA, Pos2=P513C_CB, degangle=5, molecule=Atto590
- rotateline Pos1=dyeatom87, Pos2=dyeatom85, degangle=10, molecule=Atto590
- mutate(molecule,chain,resi,target="CYS",mutframe="1"):
- Mutate a /molecule//chain/resi into a target, and selecting most probable frame 1
- mutate 1HP1, chain=A, resi=515, target=CYS, mutframe=1
- toline(Pos1,Pos2,atom,molecule,dist=1):
- Translate molecule atom, 1 angstrom away in the same direction Pos1->Pos2 specify
- toline Pos1=P513C_CA, Pos2=P513C_CB, atom=dyeatom87, molecule=Atto590, dist=3
Available through rotkit.functionname
- printMat(matrix):
- prints the TTT matrix in a readable format. (4X4)
- getxyz(Sel):
- output is a list [x,y,z] in float. The input can be a list, a string(list) or a selection.
- vector(Sel1,Sel2):
- Finds the vector between points. Gets the xyz list from getxyz, so input can be anything.
- vectorstr(vector):
- turn a vector in list format into string. No real function actually.
- transmat(vector,dist=1):
- Makes a TTT translation matrix for according to the input vector. The vector is multiplied with dist.
- unitvector(vector):
- Make a vector a unitvector.
- radangle(angle):
- Convert degree to radians. Not that all input are assumed to be in degrees, and are converted automatically.
- rotmat(angle,vectornorm,pointcoord):
- This function is the most important. That makes the TTT matrix that rotates a molecule around a normalized vector, which goes through a coordinate point.
- crossprod(Vector1, Vector2):
- Makes a crossproduct between two vectors
- crosspoint(Pos1, crossprod):
- Returns the endpoint for the Position plus the crossproduct vector. Suitable if one would like to rotate around a crossvector.
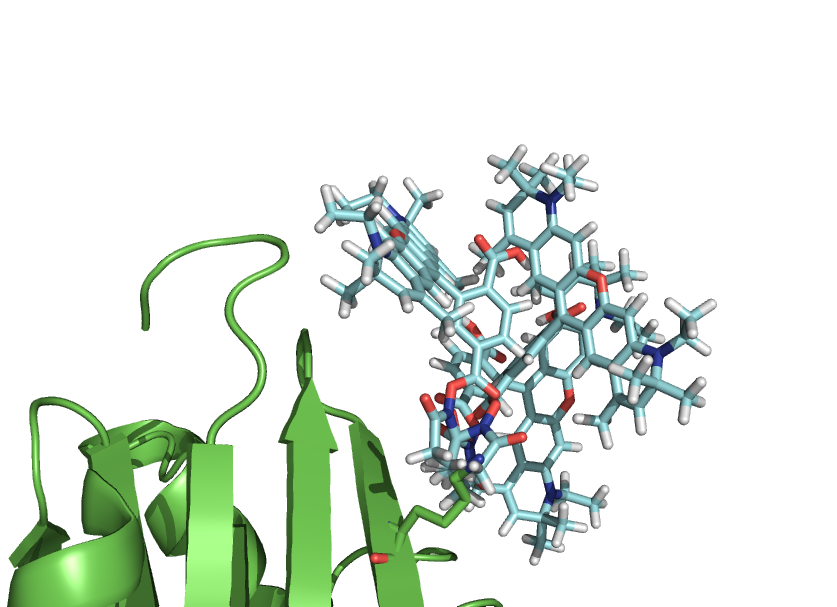
Place your dye how you want. You always get same ending position.
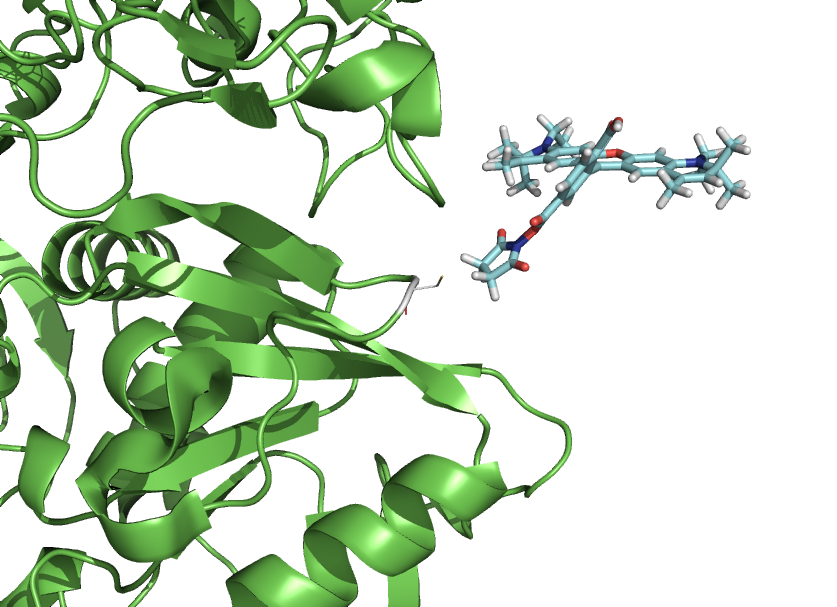
Mutate a residue through command line, and quickly put your dye there.


Example of use
Example 1 - Make a rotation of domain
| Download: examples/rotkit_1.pml | |
| This code has been put under version control in the project Pymol-script-repo | |
<include src="https://raw.github.com/Pymol-Scripts/Pymol-script-repo/master/examples/rotkit_1.pml" highlight="python" />
Example 2 - Simulate dye freedom
| Download: examples/rotkit_2.pml | |
| This code has been put under version control in the project Pymol-script-repo | |
<include src="https://raw.github.com/Pymol-Scripts/Pymol-script-repo/master/examples/rotkit_2.pml" highlight="python" />
Example 3 - Create distance distribution histogram
| Download: examples/rotkit_3.pml | |
| This code has been put under version control in the project Pymol-script-repo | |
<include src="https://raw.github.com/Pymol-Scripts/Pymol-script-repo/master/examples/rotkit_3.pml" highlight="python" />
Example 4 - A tutorial file
To understand how the functions works, read through the tutorial. Hash/Unhash "##" each step at the time to see the effect. To be able to follow the tutorial, you need the dye molecule, which is loaded from the Pymol-script-repository.
| Download: examples/rotkit_4.pml | |
| This code has been put under version control in the project Pymol-script-repo | |
<include src="https://raw.github.com/Pymol-Scripts/Pymol-script-repo/master/examples/rotkit_4.pml" highlight="python" />