This is a read-only mirror of pymolwiki.org
Practical Pymol for Beginners
Although PyMol has a powerful and flexible command line interface, it can appear daunting to new users. This guide is intended to introduce PyMol basics without leaving the mouse behind.
About the command line
The PyMol command line is a great tool that lets the experienced user change all sorts of options that simply don't appear in the point-and-click graphical interface. It can also be a lot faster. Combined with scripting, it is a powerful option for automating tasks and making intricate changes. Page upon page of PyMol documentation cover these commands, so we're going to ignore them.
Although this guide may include some text commands (like this), they're purely optional and meant to be informative, not required.
About the viewer
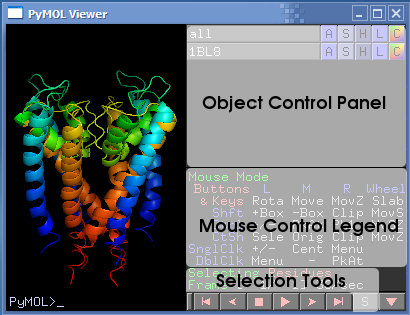
The PyMol Viewer is where the 3D models are displayed, and allows the user to interact with the models. The Object Control Panel is used to change colors, viewing mode, apply labels, remove objects, and just about anything else relating to objects. (An object is normally a group of molecules loaded from a PDB coordinate file.) Each object is displayed by name followed by a set of command buttons which change or manipulate the object. Here are the menus and some of their options:
- A - Actions: Close, etc
- S - Show: Change the way an object is represented, eg change stick view to cartoon view.
- H - Hide: Things that are shown using S accumulate, and don't automatically replace the last view. H has commands for hiding unwanted representations.
- L - Label: Label atoms, residues, etc.
- C - Color: Change the color of atoms and groups.
Visualize a protein
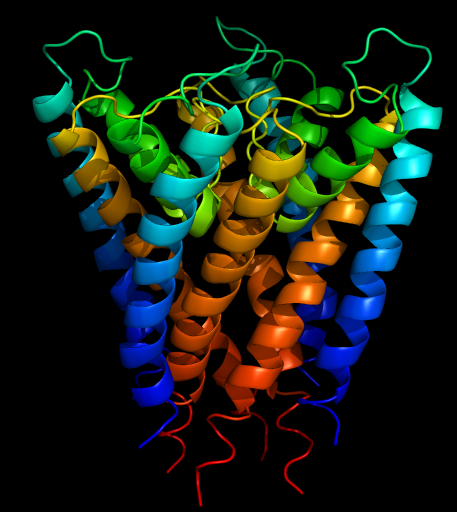
These instructions cover opening a PDB file and using PyMol as a RasMol replacement. The end result will be a graphic like this:
- Obtain a PDB coordinates file for your favorite protein. (The Protein Data Bank is a public structure repository containing over 40,000 protein structures in PDB format available for download, not a bad place to look.)
- Open the PDB file using File, Open... from the menu bar. The protein's structure will appear, probably rendered as sticks.
- On the left side of the PyMol window is the objects loaded from the PDB, and the command buttons. Each button contains a submenu that can be used to manipulate the object. Click S, then cartoon to show the protein's secondary structure in typical cartoon form.
- To change the color of each protein chain (as defined in the coordinate file), click C then select Chainbows from the By Chain menu.
- Click and drag the protein to change the view. A legend for mouse actions is below the object control panel.
- (Cover mouse matrix abbreviations)
Save an image
- Once you've found the appropriate view, save an image using File, Save image... An picture of the current view will be saved in PNG format.
- Using the ray command before saving will draw a higher quality version of the molecule with shadows, etc.
Other
- Reinitialize hint
TODO:
- Capitalization for internal GUI features?
- Definition of an object?
- Objects vs selection objects?
- Pic of External GUI for command line

