This is a read-only mirror of pymolwiki.org
Difference between revisions of "Practical Pymol for Beginners"
| Line 110: | Line 110: | ||
Because of the way PyMOL is built on top of the Python interpreter, any command that PyMOL doesn't recognize it passes on to Python to execute. This is a '''very''' handy feature--you essentially have a live Python interpreter you can interact with, which makes your life much easier. Take the following for example: | Because of the way PyMOL is built on top of the Python interpreter, any command that PyMOL doesn't recognize it passes on to Python to execute. This is a '''very''' handy feature--you essentially have a live Python interpreter you can interact with, which makes your life much easier. Take the following for example: | ||
| − | <source lang="python | + | <source lang="python"> |
f = 10. | f = 10. | ||
for x in range(0,100,10): | for x in range(0,100,10): | ||
Revision as of 09:16, 5 June 2012
Although PyMol has a powerful and flexible interface, it is complex, and can appear daunting to new users. This guide is intended to introduce the PyMol interface and basic tasks without leaving the mouse behind.
The PyMol Interface
When PyMol is opened, two windows appear. The smaller window (called the "External GUI" in PyMol documentation) contains the menu bar (File, Edit, Help, Display, etc), shortcut buttons for common commands, and the command line.
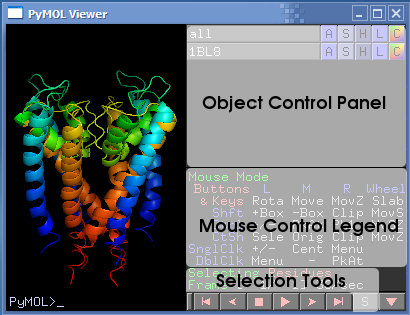
The second window is the PyMOL Viewer, which is where all the magic happens. In the Viewer, 3D models are displayed, and the user interacts (eg rotates) and manipulates the model.
The objects that PyMOL renders in 3D are loaded from coordinate files that describe (in great detail) locations of individual atoms in the molecule. PyMOL can display more than one object at a time, and provides an Object Control Panel to adjust viewing modes, colors, labels, hiding, and just about anything else relating to objects. After each object name is a set of command buttons which control the object. Here are the buttons and some of their options:
- A - Actions: Rename, duplicate, remove, apply presets (like "ball-and-stick" or "publication"), perform computations
- S - Show: Change the way things appear, eg change to stick or cartoon view.
- H - Hide: Things that are shown using S accumulate, and don't automatically replace the last view. H is the opposite of S and hides unwanted representations.
- L - Label: Label atoms, residues, etc.
- C - Color: Change the color of atoms and groups.
The lower-right corner of the Viewer contains a guide to using the mouse, as well as a powerful selection tool. There is also another command line at the bottom of the Viewer (PyMOL>).
About the command line
The PyMol command line is a great tool that lets the experienced user change all sorts of options that simply don't appear in the point-and-click graphical interface. It can also be a lot faster. Combined with scripting, it is a powerful option for automating tasks and making intricate sets of changes. But, it's complex, and page upon page of PyMol documentation cover these commands, so we're going to ignore them as much as possible.
Although this guide may include some text commands and links to more advanced documentation, they're purely optional and meant to be informative.
To run any text command, type it in at a PyMOL> command line and hit [Enter].
Getting started: explore a protein
PyMol is great for casual visualization of biological molecules. In this example, a PDB file describing a protein is loaded and its style and color are tweaked.
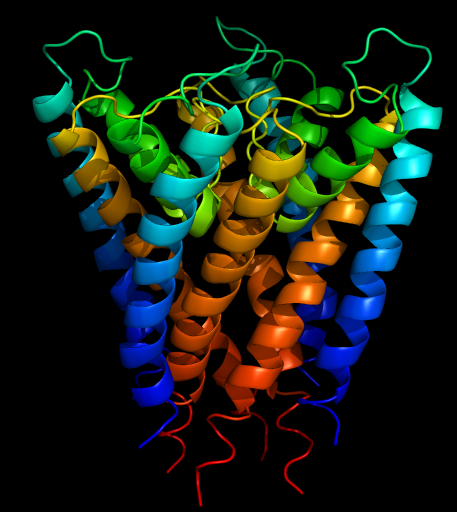
- Obtain a PDB coordinates file for your favorite protein. (The RCSB Protein Data Bank is a public structure repository containing over 40,000 protein structures in PDB format available for download, not a bad place to look.) For this example, we're using the potassium channel from Streptomyces Lividans (1BL8).
- or just type, and you can skip the next step (see Fetch command), as PyMOL will open the file for you.
fetch 1bl8
- or just type,
- Open the PDB file using File => Open... from the menu bar. The protein's structure will appear, probably rendered as simple bonding lines.
- The right side of the Viewer shows the loaded PDB as an object, as well as its command buttons. Each button contains a submenu with more options. Click S, then cartoon to show the protein's secondary structure in popular cartoon form.
- Notice that the lines view is still visible on top of the cartoon view. To hide the lines, click H then lines.
- To change the color of each protein chain (as defined in the coordinate file), click C then select chainbows from the by chain menu. "Chainbows" colors residues in each protein chain as a rainbow that begins with blue and ends with red.
- Another common coloring method assigns a single color to each chain. Click C then select by chain from the by chain menu.
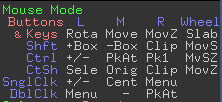
- Click and drag the protein to change the view. A list of mouse buttons is below the object control panel.
- Rota: Rotate
- Move: Translate object along an axis
- MoveZ: aka Zoom
- Sele: Select`
- Slab:
- Cent:
- PkAt:
Related Commands
Load, Fetch, Color, Show, Show_as, Cartoon, Lines, Rotate, Select, Center
What else can this thing do?
So, now what? Good question. PyMOL is a powerful program, and everyone uses it for something different. The remainder of this guide is devoted to common tasks that come in handy.
Saving an image
You've found the perfect view, and you'd like to Save it?
- Change the size of the viewer and zoom in/out to make the image the right size. Images are saved exactly as they appear in the viewer, and the size of the viewer determines the size of the image.
- For example, images for printing and presenting should be larger than images for a posting on a website.
- Because PyMOL was designed to run on older computers, the maximum quality is not enabled by default. To change this, select Display, Quality, Maximum Quality. Notice that round things are rounder, curves are curvier, and color shading is smoother.
- Once you've found the appropriate view, save an image using File, Save Image... An picture of the current view will be saved in PNG format.
Tip: Using the ray command before saving an image will create a higher quality version with shadows, etc. This can take time, depending on the size of the image and speed of the computer, but the images created after ray tracing are usually spectacular. However, the ray tracing disappears if the view is changed in any way.
Selecting parts of an object
Sometimes it might be useful to select part of an object and modify it directly; for example, selecting active-site residues in a protein to highlight them in another color.
In the lower-right corner of the Viewer, next to the animation controls, is an S button (not to be confused with the Show button in the object control panel) that activates the selection tool. The selection tool can be changed to select atoms or residues by clicking Selecting Residues(or whatever) until the right mode appears.
Once selecting is activated, a list of parts to select appears at the top of the Viewer. Select things clicking or dragging across a range.
Selections can be controlled individually in the object control panel, just like any other object. To save a selection, select rename from the A menu.
Whoops: Getting unstuck
PyMOL is a program meant to be explored and played with, and sometimes funny things happen in the process. A few common problems:
- The model disappeared: Sometimes while rotating and moving a model, it can get lost. Right-click the background of the viewer, and select reset from the Main Pop-Up. The model should return to view; if it doesn't, make sure the object is being drawn using the S menu.
- The model has funny colors, labels, etc and they won't go away: The H menu in the object control panel will remove unwanted details; however, sometimes it's difficult to know exactly what to remove. Select H, then everything to hide all details and start fresh.
- Things are really messed up: Use File, Reinitalize to reset PyMOL to its initial state, but all work will be lost.
Related Commands
Save, Viewport, Zoom, Save, Ray, Select
Saving work
PyMOL supports saving your work in various formats. You can save, images, molecules, sessions, movies, etc.
Sessions
A PymOL sessions retains the state of your PyMOL instance. You can save the session to disk and reload it later. You can setup a complicated scene, with transitions and more, and simply save it as a PyMOL Session (.pse) file. Use, File=>Save Session or Save Session As....
Loading sessions is just as easy: File=>Load and choose your session file.
Molecules
You can save a molecule by selecting File=>Save Molecule. A dialog box will appear from which you can select your molecule to save. You can also save an object or selection using the Save command. It's very easy:
save fileName, objSel
where fileName is something like "1abc.pdb", and objSel can be any object or selection. For example, to save just the waters to disk do:
save wat.pdb, resn HOH
Images
You can save images that you've rendered (with Ray) or drawn (with Draw) again using the Save command or by File=>Save Image. You can save in Png, VRML-2 and the POVRay formats.
You can save images to disk, through the command line, by using the Png command.
Movies
PyMOL allows you to save movies you've created, too. You can automatically save the MPEG or save a series of PNG files--for stitching together later. This is a new command, and I don't know too much about it. Use File=>Save Movie.
Scripting
Introduction and Very Simple Scripting
Scripting in PyMOL ranges from very simple to very intricate. You can make a simple loop (say rotating a molecule one-degree at a time) or execute full featured scripts. Once you've got the basics of PyMOL down, learning scripting will greatly enhance your productivity and capabilities.
Because of the way PyMOL is built on top of the Python interpreter, any command that PyMOL doesn't recognize it passes on to Python to execute. This is a very handy feature--you essentially have a live Python interpreter you can interact with, which makes your life much easier. Take the following for example:
f = 10.
for x in range(0,100,10):
  cmd.set("spec_direct_power", float(float(x) / f))
  cmd.png("spec_dir_power" + str(x) + ".png", ray=1)
This simple script of 4 lines will create 10 images each one with the Spec_direct_power changed (see the Spec_direct_power for the output of this script; the animated GIF). Did you notice that f on line 1 and for and x on line 2 are not PyMOL commands or symbols? You can simply write Python code that interacts with PyMOL. Brilliant!
The Python MiniShell
Taking this one level higher, you can write little code snippets, like 10-20+ lines of code that perform some specific task and wrap these in the python and python end commands. (If your script ever makes a mistake, you can abort the endeavor with end instead of python end. The power here is that none of your command are executed until you type python end. Confused? Here's the above example in using the wrapper:
python
f = 10.
for x in range(0,100,10):
  cmd.set("spec_direct_power", float(float(x) / f))
  cmd.png("spec_dir_power" + str(x) + ".png", ray=1)
python end
The python command gives you complete access to the Python shell & python end just brings you back into PyMOL's shell. Also, note that PyMOL saves information across instantiations of the python command. For example,
# enter mini python shell
python
ff = 10.
python end

# no we're back in PyMOL; where PyMOL knows about the value
print ff

# in the mini shell, Python still knows about ff.
python
print ff
python end
Learning More...
To learn more about scripting check out:
- Simple_Scripting introduction
- Advanced_Scripting pages
- Popular Script Library.


