This is a read-only mirror of pymolwiki.org
Difference between revisions of "Ray"
| (12 intermediate revisions by the same user not shown) | |||
| Line 1: | Line 1: | ||
===DESCRIPTION=== | ===DESCRIPTION=== | ||
| − | + | '''ray''' creates a ray-traced image of the current frame. This can take some time (up to several minutes, depending on image complexity). | |
| − | + | ||
| − | |||
| − | |||
| − | |||
===USAGE=== | ===USAGE=== | ||
| − | + | ray [width,height [,renderer [,angle [,shift ]]] | |
| − | + | ''angle''' and '''shift''' can be used to generate matched stereo pairs | |
| − | + | ||
| − | |||
| − | |||
===EXAMPLES=== | ===EXAMPLES=== | ||
| − | + | ray | |
| − | + | ray 1024,768 | |
| − | + | ray renderer=0 | |
| − | + | ||
| − | |||
===PYMOL API=== | ===PYMOL API=== | ||
| − | <source lang="python"> | + | <source lang="python">cmd.ray(int width,int height,int renderer=-1,float shift=0)</source> |
| − | + | ||
| − | </source> | + | ===SETTINGS=== |
| + | ====Ray-Tracing modes==== | ||
| + | ray_trace_mode = 0: normal color | ||
| + | |||
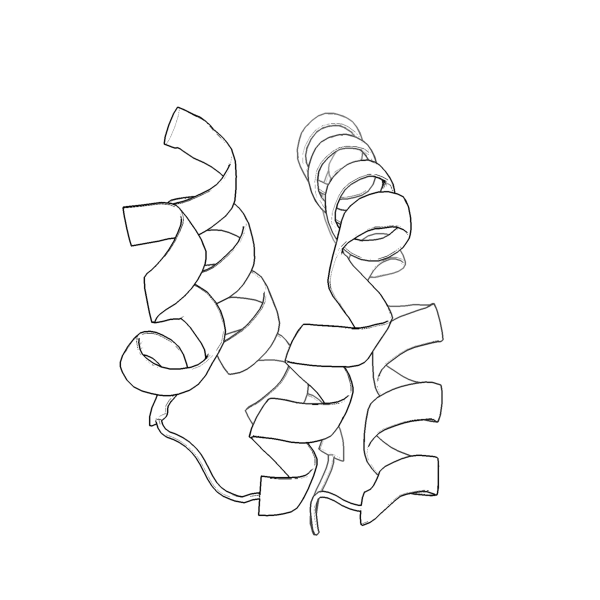
| + | ray_trace_mode = 1: normal color + black outline | ||
| + | |||
| + | ray_trace_mode = 2: black outline only | ||
| + | |||
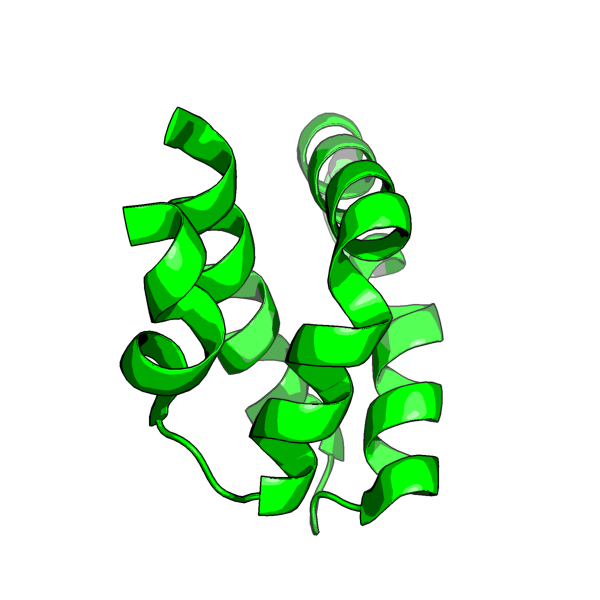
| + | ray_trace_mode = 3: quantized color + black outline | ||
| + | |||
| + | set ray_trace_mode, 1 # (or 2 or 3; best with "bg_color white;set antialias,2") | ||
| + | These two new modes -- 2 and 3 -- are cool cartoon looking modes. | ||
| + | |||
| + | Here are the example images for the new modes | ||
| + | [[Image:1l9l.png|thumb|center|Black and White (ray_trace_mode,2); click to see full image]] | ||
| + | # Black and White Script | ||
| + | load /tmp/3fib.pdb; | ||
| + | show cartoon; | ||
| + | set ray_trace_mode, 2; # black and white cartoon | ||
| + | bg_color white; | ||
| + | set antialias, 2; | ||
| + | ray 600,600 | ||
| + | png /tmp/1l9l.png | ||
| + | |||
| + | |||
| + | [[Image:1l9l_2.png|thumb|center|Color mode (ray_trace_mode,3); click to see full image]] | ||
| + | # Color Script | ||
| + | load /tmp/thy_model/1l9l.pdb; | ||
| + | hide lines; | ||
| + | show cartoon; | ||
| + | set ray_trace_mode, 3; # color | ||
| + | bg_color white; | ||
| + | set antialias, 2; | ||
| + | remove resn HOH | ||
| + | remove resn HET | ||
| + | ray 600,600 | ||
| + | png /tmp/1l9l.png | ||
| + | |||
| + | ====Perspective==== | ||
| + | ====Perspective Example Images==== | ||
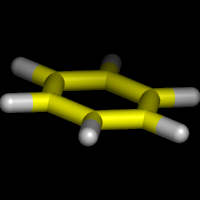
| + | [[Image:No_persp.png|thumb|left|Example with Perspective Turned Off]] | ||
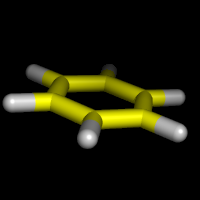
| + | [[Image:Persp1.png|thumb|left|Example with Perspective Turned On]] | ||
| + | [[Image:Persp2.png|thumb|left|Example with Perspective Turned On and Field of View Set High (70).]] | ||
| + | |||
| + | |||
| + | |||
| + | |||
| + | |||
| + | |||
| + | |||
| + | |||
| + | |||
| + | |||
| + | |||
| + | |||
| + | |||
| + | =====Notes===== | ||
| + | PyMol 0.97 and prior used '''orthoscopic''' rendering -- that is, no perspective. Upon the arrival of 0.98 and later, we get perspective based rendering at a cost of a 4x decrease in render speed. If you want perspective | ||
| + | set orthoscopic, off | ||
| + | Otherwise | ||
| + | set orthoscopic, on | ||
| + | To magnify the effect of perspective on the scene, | ||
| + | set field_of_view, X | ||
| + | where 50<X<70. Default is 20. 50-70 gives a very strong perspective effect. Nb. the field of view is in Y, not X as one would expect. | ||
| + | |||
| + | ====Renderer==== | ||
| + | '''renderer = -1''' is default (use value in ray_default_renderer) | ||
| + | |||
| + | '''renderer = 0''' uses PyMOL's internal renderer | ||
| + | |||
| + | '''renderer = 1''' uses PovRay's renderer. This is Unix-only and you must have "x-povray" in your path. It utilizes two temporary files: "tmp_pymol.pov" and "tmp_pymol.png". | ||
| + | |||
| + | ====Ray Tracing Stereo Images==== | ||
| + | See [[Stereo_Ray]]. | ||
| − | |||
| − | |||
| − | |||
| − | |||
| − | |||
| − | |||
| − | |||
| − | |||
===SEE ALSO=== | ===SEE ALSO=== | ||
| − | + | "help faster" for optimization tips with the builtin renderer. "help povray" for how to use PovRay instead of PyMOL's built-in ray-tracing engine. | |
| − | |||
| − | |||
| − | ray-tracing engine. | ||
==USER Comments== | ==USER Comments== | ||
Revision as of 23:57, 2 January 2006
DESCRIPTION
ray creates a ray-traced image of the current frame. This can take some time (up to several minutes, depending on image complexity).
USAGE
ray [width,height [,renderer [,angle [,shift ]]]
angle' and shift can be used to generate matched stereo pairs
EXAMPLES
ray
ray 1024,768
ray renderer=0
PYMOL API
cmd.ray(int width,int height,int renderer=-1,float shift=0)
SETTINGS
Ray-Tracing modes
ray_trace_mode = 0: normal color
ray_trace_mode = 1: normal color + black outline
ray_trace_mode = 2: black outline only
ray_trace_mode = 3: quantized color + black outline
set ray_trace_mode, 1 # (or 2 or 3; best with "bg_color white;set antialias,2")
These two new modes -- 2 and 3 -- are cool cartoon looking modes.
Here are the example images for the new modes
# Black and White Script
load /tmp/3fib.pdb;
show cartoon;
set ray_trace_mode, 2;  # black and white cartoon
bg_color white;
set antialias, 2;
ray 600,600
png /tmp/1l9l.png
# Color Script
load /tmp/thy_model/1l9l.pdb;
hide lines;
show cartoon;
set ray_trace_mode, 3; # color
bg_color white;
set antialias, 2;
remove resn HOH
remove resn HET
ray 600,600
png /tmp/1l9l.png
Perspective
Perspective Example Images
Notes
PyMol 0.97 and prior used orthoscopic rendering -- that is, no perspective. Upon the arrival of 0.98 and later, we get perspective based rendering at a cost of a 4x decrease in render speed. If you want perspective
set orthoscopic, off
Otherwise
set orthoscopic, on
To magnify the effect of perspective on the scene,
set field_of_view, X
where 50<X<70. Default is 20. 50-70 gives a very strong perspective effect. Nb. the field of view is in Y, not X as one would expect.
Renderer
renderer = -1 is default (use value in ray_default_renderer)
renderer = 0 uses PyMOL's internal renderer
renderer = 1 uses PovRay's renderer. This is Unix-only and you must have "x-povray" in your path. It utilizes two temporary files: "tmp_pymol.pov" and "tmp_pymol.png".
Ray Tracing Stereo Images
See Stereo_Ray.
SEE ALSO
"help faster" for optimization tips with the builtin renderer. "help povray" for how to use PovRay instead of PyMOL's built-in ray-tracing engine.
USER Comments
How do I ray trace a publication-ready (~300dpi) image using PyMol?
This answer is in the Advanced Issues (Image Manipulation Section).
