This is a read-only mirror of pymolwiki.org
Difference between revisions of "3DNA"
| Line 29: | Line 29: | ||
To generate the previous image the following script was used: | To generate the previous image the following script was used: | ||
trna.pml | trna.pml | ||
| − | + | == Syntax == | |
| − | < | + | <source lang="python"> |
load tb.pdb | load tb.pdb | ||
load t2.r3d | load t2.r3d | ||
| Line 65: | Line 65: | ||
png trna.png | png trna.png | ||
quit | quit | ||
| − | </ | + | </source> |
| − | |||
An automatically generated pymol ray traced image can also be obtained by running <b>blocview</b> from 3DNA v. 2.0 directly. Using the following command: | An automatically generated pymol ray traced image can also be obtained by running <b>blocview</b> from 3DNA v. 2.0 directly. Using the following command: | ||
Revision as of 00:44, 7 March 2008
3DNA
3DNA[1] provides a perl script (blocview) which produces Calladine-Drew style block representations based on the standard reference frame for nucleic acids. The produced files are in raster3D format, and are also processed by molscript. Therefore to produce the following representations you will need to install:
- 3DNA V1.5 [2]
- 3DNA V2.0 [3]
- Raster 3D [4]
- Molscript [5]
Once you have the previous software installed, and the path to their binaries correctly configured, you can get the block representation for any nucleic acid. The next example shows how to do it for tRNA (PDB:ID 1ehz)
pdb_get.py 1ehz
blocview -o 1ehz.pdb
The pdb_get python script comes from Dr. Robert Campbell's website http://pldserver1.biochem.queensu.ca/~rlc/work/scripts/pdb_get.py [6]
Once blocview is run it will generate various r3d files which can be combined with the original pdb files to produce the following image:
Example
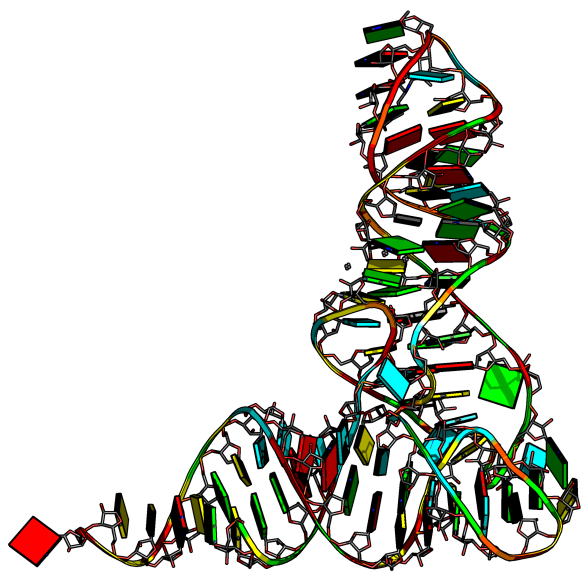
using tb.pdb and t2.r3d

To generate the previous image the following script was used: trna.pml
Syntax
load tb.pdb
load t2.r3d
bg_color white
hide lines
zoom *,-5
set ray_trace_mode, 3
set ray_trace_fog, 0
sert ray_shadows, 0
set orthoscopic, 1
set antialias, 5
set valence, 1
util.cba(29)
color grey, (elem C)
cartoon arrow
set cartoon_ladder_mode, 0
set cartoon_rect_width, 0.2
set cartoon_rect_length, 0.5
show cartoon
set stick_radius, 0.14
show sticks
set_view (\
     0.680474579,   -0.153203458,   -0.716576934,\
     0.658882320,   -0.300013036,    0.689829707,\
    -0.320666909,   -0.941552401,   -0.103208199,\
    -0.000084338,    0.000022471, -263.030426025,\
    57.723434448,   45.338260651,   20.895099640,\
   218.710235596,  307.348541260,    1.000000000 )
set cartoon_color, green, resn G
set cartoon_color, yellow, resn C
set cartoon_color, red, resn A
set cartoon_color, cyan, resn U
ray 1024,768
png trna.png
quit
An automatically generated pymol ray traced image can also be obtained by running blocview from 3DNA v. 2.0 directly. Using the following command:
blocview -o -t=100 1ehz.pdb
And the result is:

More examples of figures obtained using 3DNA for preprocessing can be found at:
[[7]]